 |
EASY HALF-SQUARE TRIANGLES
|
 |
EASY HALF-SQUARE TRIANGLES
|
![]()
![]() Square
Size (S):
Square
Size (S):
Make your grid squares 1" bigger than the FINISHED size of the two-triangle squares, or 1/2" bigger than the UNFINISHED size.
![]() Grid
Size (N):
Grid
Size (N):
Figure out how many half-square triangles you need for the whole project. For instance, if there are 4 per block and you need 12 blocks, you will want a grid that makes 48 squares (4 x 12 = 48). Divide this number of squares by 2, because each square in the grid makes TWO. You will want a grid with 24 squares (N = 24). If N is divisible by 4, your grid can be 4 x 'whatever' squares (in the above example, 4x6). You want a rectangular grid, not a square one, so if N = 16, I recommend 2x8 for the grid, not 4x4. Likewise, 36 is better as 9x4 than as 6x6.
![]() Cut
out the grid:
Cut
out the grid:
Place the two fabrics right sides together and cut out a rectangle. If your grid is to be 4x6, and your square size (S) is 3", then cut out a rectangle that is 12" x 18" (4 x 3" by 6 x 3"). I use my rotary mat for this, and my rotary ruler.
![]() Mark
the grid:
Mark
the grid:
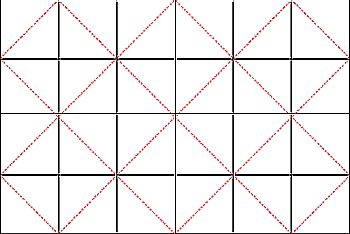
Leave the two fabrics, right sides together, on the rotary mat with the lighter color on top. Using a permanent marker of any kind (a laundry marker or Sharpie fine point permanent marker), draw lines every (S) inches vertically and horizontally from the edges. Then, starting at the top left corner, draw a diagonal line through the intersections to the opposite edge of the fabric. Skip one vertical line and go to the next to draw the next diagonal. Then go down the left side and skip one horizontal line and, at the next one, draw another diagonal parallel to the first. When this is all done on the top edge, go to the first vertical line right of the top left corner and draw a diagonal the other direction (top right to bottom left).

All these lines are cutting lines, NOT sewing lines! That's why you can use a bold permanent marker. You may want to stick a couple straight pins somewhere on the grid on a couple of vertical-horizontal intersections to keep the fabrics from shifting. Usually they'll stick together pretty well. Two pins will usually do it.
![]() Sewing
The Grid:
Sewing
The Grid:
Use a thread that contrasts with one of your fabrics, and a fairly small stitch so it won't show on the quilt. Get a presser foot out that is slightly LESS than 1/4" from the needle to the edge of the presser foot. On a scrap, draw a line and sew with the line along the edge of your foot. Measure it. 1/4" is okay, but not a thread width more! Less is better. About 3/16" is ideal. Then, starting in one corner, put the outside of your presser foot on one of the diagonal lines. Stitch to the opposite edge of the fabric. Rotate the fabric 90 degrees and stitch up the next diagonal. Pivot at the fabric edges (90 degrees) until the whole grid has a seam beside every diagonal line. At the last corner, rotate the fabric 180 degrees and stitch back up the other side of all the diagonals. You don't have to cut your thread at all, if your machine has an automatic needle-up position. If it doesn't, you may want to pull the fabric towards you an inch or so before repositioning it at each rotation point (to get slack in the thread on the outside corners).
![]() Cutting:
Cutting:
Do not press at this point. The little shifting that may have occurred or the difference in top and bottom tensions may result in something that looks unsettling, but we have enough slop factor built in, that these will be corrected in the trimming. Cut on all marked lines (vertical, horizontal and diagonal). Don't open and iron yet!
![]() Trimming:
Trimming:
This is the tedious part. Get one of your square cutting rulers and a piece of thin tape. You want to put a diagonal piece of tape across the square. Measure S minus 1/2" from one corner and make a mark. Measure the same distance down the side and make another mark. Connect these marks with the tape. I like the tape on the top of my plastic square, it's easier to see. This measurement is critical, so once your tape is positioned, double check it. It should be the unfinished size of the half-square triangles you want to end up with. Picking up one of the triangles you just cut, position the taped line right on the seam line (that's why you used contrasting thread - easier on the eyes). With your rotary cutter, trim off everything that is outside the plastic square. There is 1/8" slop built into this method, so your cuttings will average 1/8" unless you sewed a generous 1/4" from the diagonal. When they are all trimmed, put them on the ironing board DARK SIDE UP.
![]() Pressing:
Pressing:
One at a time, grab the unsewed corner of each triangle and lift it open and iron it back. Doing it this way will put all the seams on the dark side.
Voila! You are done with the half square triangles!
Please send questions, thoughts or suggestions to:
jowens@trib.com
![]()
This page has been visited times since 1/6/00.
[Click HERE for LIVE Chat NOW!!!]
[ChanOps]
[Chat]
[Stats] [Schedule] [SuperChats]
[Lessons] [Links]
[Send a Quilty Postcard to your
Friends!!!]
![]()